One of the things that I found really daunting when I started out as a makeup artist was where to start with my makeup kit. It wasn't until I started doing regular jobs that I realized all the little things that are so important to have in your kit.
I have put together a little list of the main things that I really couldn't live with out now on any makeup job, big or small.
Building your kit can be very costly at first so I have given some great cheaper alternatives as well as the higher priced items.
The first thing you need to get is something to put your makeup in.
These clear toiletry bags from boots are one of the first things I bought for my kit and I still use them to this day. They are fantastic and at £8 for the set of 3 you can't go wrong. I always use clear bags to store my makeup, it makes rummaging through looking for what I need a lot quicker and easier.
You can buy these from here
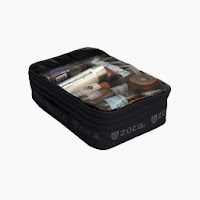
As my kit grew, so did my storage. I now use a Zuca, which is one of the best things I've ever bought. It it sturdy, small but holds a lot inside, and is easy to travel with on trains or in the car. It also doubles up as a seat on long packed out train journeys. It has pouches that you can buy separately to organize your makeup neatly. I couldn't believe how much you could fit in these things. I bought mine from here. They are a little pricey at around £180 but so worth it if you are serious about becoming a MUA.
Essentials
One of the most important things is to keep your kit tidy and hygienically clean.
Always have brush cleaner, it is SO important to clean your brushes with a brush cleaner that will kill any germs, soap and water will not to this. Mac brush cleaner is my favorite because it drys quickly so you can wash your brushes in between clients with out having to wait too long in between for the brushes to dry.
70% isopropyl alcohol is good to have to disinfect your products, especially things like lipsticks and eyeliners if you're using them on different people. You definitely don't want to be passing any infections on to your clients.
Tissues are a must have, you'll need these for all your brush cleaning and disinfecting, not to mention any spills you might want to mop up.
Hand sanitizer is something I always carry with me and am sure to use it before every client.
Brush cleaner- Mac Cosmetics £10 | Hand Sanitizer - Soap & Glory £2.50
Its also important to have disposables in your kit for hygiene.
Mascara wands and lip gloss brushes especially. Its also a good idea to get some sponge wedges and powder puffs. A great website that sells these pretty cheap is EYES LIPS FACE.
Always have cotton buds, cotton pads and makeup wipes to hand. These are a life saver for any little slip ups and mistakes. You never know how many looks you may need to do on a model/client or they may already have makeup on which you would need to remove. Try to also get a good eye makeup remover for sensitive skin.
Accessories
Sharpener- very important for obvious reasons. Need that precise point on your lip and eye pencils.
Tweezers- Helpful for many things. Putting on lashes, precise application in creative makeups, tweezing stray brow hairs for perfect shape.
Scissors- important for trimming false lashes before applying.
Brushes
Foundation brush
Mac duo fiber stippling brush #130 £30
OR
Real technique foundation brush £9.99
OR
Crown Brush Deluxe Foundation / Camouflage £11.19
Eye brushes
Mac eyeliner brush #210 £16.50
Mac Blending brush #217 £18
Crown brush oval fluff £2.39
Powder/ Blusher brushes
Mac powder brush #129 £27
Crown brush blusher brush Badger angle brush £8.69
Other brushes
Mac angle brush #266 £16.50
Charlotte Tilbury lip brush £18
These are my basic go to brushes. Crown brush are brilliant for affordable and quality brushes. This is a great place to start to build your brush collection. Also Real Techniques are another option.
I love my MAC brushes as they are fantastic quality and last forever, although they are a little pricey. I have built my Mac brushes up bit by bit so its more affordable.
Makeup
Skincare & Primers
Moisturisers- I use a variety of different moisturisers, its good to have one for oily skin and one for dry.
both give a fantastic base to create your makeup looks on your clients.
Foundation/ Concealer / Powders
When buying your first lot of foundations, you do not need to buy every single colour. I started with a light a medium and a dark, then you can literally mix any colour.
I recommend MAC Studio fix £21.50, its great coverage on its own or you can mix with moisturizer for a lighter finish if desired.
Same goes for the powders, light medium and dark. I recommend MAC Mineralize Skinfinish £22 or MAC blot powder £20 to start with. These are both great for setting the makeup & getting rid of shine. You could also get a translucent powder for setting as one colour fits all!
MAC concealer palettes £35 are fantastic and are pretty much the only concealers I really use in my kit. The palette contains 6 colours including 2 colour corrector shades. buying them in the palette also is a lot cheaper and keeps your kit nicely organized too.
I recommend getting a couple of the Sleek blusher pallettes £9.99 to start off with. They are such beautiful colours and so well pigmented. You get 3 in each palette and for £9.99 that's amazing value!
My go to bronzer is MAC Matte Bronze £20. I use this on almost everyone, it suits all skin tones is matte so can be used for contouring as well.
Eyes
Naked palette should be the first set of eye shadows you get your hands on. It contains your staple colours and you will find you use it so much! £37
I love the sleek eye shadow palettes too, they do a great neon palette that is so handy to have in your kit. £7.99
You could also buy a MAC 15 pro palette. You buy these empty and then fill up the eye shadows as you go along. The empty casing is about £20 and each pan refill eye shadow costs £10. Buy the eye shadows bit at a time and you will fill it up in no time, and it wont be such a hit to the pocket!
Get your hands on some pencil and liquid eye liners - Basic colours Black, Brown, Blue.
You'll also need some mascaras in your kit, and remember to always use your disposable wands when you apply it.
Lips
I find the easiest and most affordable way to start your lipstick collection is to buy the lipstick pallettes. not only is this a lot easier to find the colour you are after, it is also a lot cheaper than buying all your lipsticks individually.
Mac also do some brilliant lipstick palettes with 6 lipstick colours in for a higher price of £35
Lipgloss- Get your hands on a clear gloss to start with and then build up as you go along.
Lipliner- Also start with a few staple lip liner colours, I recommend to get a red, pink and neutral/brown.
I hope this helps all of you new MUA's out there. Please let me know what you think and if there's anything else you would add!

.JPG)


.JPG)
.JPG)
.JPG)


.PNG)


.PNG)
.PNG)
.PNG)


